Introduction to Docker: A Beginners Guide

In this article, you will learn about the core concepts of Docker, its uses, and how containerization technology can help you scale your application to millions of users.
Docker has been around for quite some time now, almost a decade, but it is something that a lot of newcomers try to stray away from. Everyone knows that it is important to learn, but for some reason are afraid of it.
Worry not! In this blog, we will be going through all the necessary concepts of Docker which would help you not only work with Docker Containers used in production but also create your own Docker Images from scratch!
Contents
- Introduction
- Docker Architecture
- Running a Docker Container
- Creating a Custom Docker Image
- Dockerizing a Node Application
- Docker Container Lifecycle
- Docker Logs
- Conclusion
Introduction
Let’s say you want to deploy an application to the internet using the old ways such as uploading files to the server, running a bunch of commands, and boom! Your application is available for anyone to navigate on the internet! Great isn’t it? Yes, it was great about a decade ago, but this is not at all a scalable way to deploy applications or maintain them on the server.
Later in this article, we will be looking at how Docker enables you to easily deploy applications on multiple servers, but for now, we will consider that you want to deploy your application to one server, like an EC2 machine on AWS or a Linode.
These are the steps that you would typically follow for deploying your application:

We will not be going over how the domain is connected to the server and how the SSL certificates are installed in this blog post, but let me know if we want to cover that in the future!
Voila! your application is successfully deployed and available for anyone to use on the internet!
Let’s say there is a lot of demand for your application, and there are a lot of suggestions for features from your users. No worries, you develop those features within a week and now you want to deploy your updated site on the internet. What will you do?
You will again follow those 3 steps with a few extra steps.

As you can see, it can get very tedious to keep deploying new changes as your application grows.
Still, let’s say you do this for a few months. But now the popularity of your site is growing and the traffic is increasing rapidly. Some users now are starting to complain about the slow load times of your site. So the traditional solution for this would be to add more servers!
So now, whenever you make any changes or build new features on your site, you have to repeat all those steps on every server you have! Not to mention that if you deploy your application on every server one at a time then your users will see two different applications depending on which server their request landed on.
Another problem is that if you want to migrate your application to a different server environment, let’s say before you were running on Ubuntu and now you will be running your application on Alpine Linux, then the commands you run for the deployment also change.
To sum up, the problems that would be faced if the application is deployed using old and traditional methods are:

Docker Architecture
This is where Docker comes into the picture. It was created and open-sourced back in 2013. Docker is a containerization technology that can package applications into isolated environments called Containers.
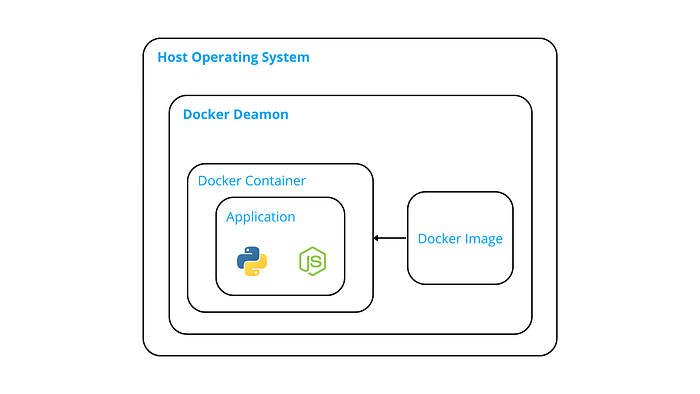
What is Containerization?
It basically is a process of creating a virtual environment on top of the host operating system dedicated to a particular application. Usually, any containerization technology is responsible for running on the underlying operating system, and in the case of Docker, it is capable of running on Linux, Windows, and macOS as well.
So for instance, you can create a Docker Image for Ubuntu 22.x and run it on top of any operating system of your choice! Due to this, you don’t have to worry about creating deployment procedures for every different OS environment your servers may have.
Architecture
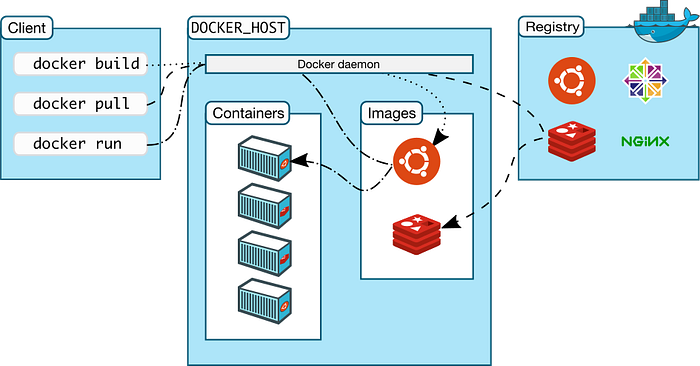
Docker follows a client-server architecture where the Docker Daemon is the server and the Docker CLI is the client.
The Docker Daemon is responsible for managing the Containers & Images.
Images are nothing but pre-built templates, essentially a virtual operating system with a list of procedures that a Container uses for creating the virtual environment for hosting the application. Isn’t that a mouthful, Here’s an image that will help visualize things.
Docker Registry
It is nothing but a service that is used for hosting Docker Images. There are two types of Docker Registries.
- Private
- Public
Docker-Hub is a public registry where all the major base Docker Images are hosted, such as Ubuntu, NodeJS, Python, Alpine Linux, and much more!
Examples of Private Docker registries can be Amazon ECR (Elastic Container Registry) or even your local Docker Registry where the Images you built locally or pulled from the internet are hosted.
Docker Client
Docker comes with a CLI tool, also known as Docker Client that can be used for interacting with the Daemon, creating docker containers, pulling remote Docker Images, and a lot of other things which we will look into in more detail later in this blog.
Now that we understand the underlying architecture and also the problems that Docker solves, I hope that you have more confidence and excitement to learn how to use Docker! So let’s jump straight into it.
Running a Docker Container
There are various methods to create and run Docker Containers.
- Running an already created Docker Image
- Creating a custom Docker Image
- Using Docker Compose
First, we’ll look at creating a Docker Container from an already existing Docker Image hosted on Docker Hub. Assuming that you have installed Docker on your machine, run the following command:
docker pull nginxThe above command will fetch the lasted Docker Image of Nginx from Docker Hub. Next, run the following command:
docker run -d -p 4000:80 nginxThe above command will run nginx as a Container. Since we provided the -d flag, the container will run in the background on port 4000 on your local machine. If you navigate to localhost:4000 you should see this page!
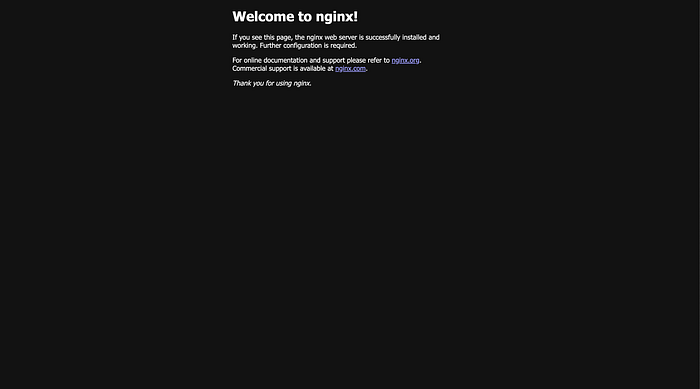
And with that, you have successfully created your Docker Container!
You may be wondering what is the meaning of 4000:80. So the number on the left side of the colon (:) is the external port, which you can use to access the application from outside the Docker Container. The number on the right side of the colon is the internal port, which is the port on which your application should be running inside the container. Nginx by default runs on port 80, that’s why we provided 80 in the command. Let’s say that your application was set to run on port 3000, then you need to provide 3000 as the internal port.
Creating a Custom Docker Image
If you remember, we used the command docker pull in the previous segment before running our Docker Container. That basically meant that we pulled an already created Docker Image from the internet and ran that as a Container. But what if we want to create our own Docker Image? Worry not, because we can absolutely do that!
For this part of the blog post, I will be Dockerizing a simple Node JS application with Express. So let’s create the sample app first by running the following commands:
npm init -y

touch app.js # Create an entry file for Node

npm i express # Install the express framework
Open the app.js file in any editor of your choice and paste the following code into the file. The code was taken from: https://expressjs.com/en/starter/hello-world.html
const express = require("express");

const app = express();

const port = 3000;

app.get("/", (req, res) => {
  res.send("Hello World!");
});

app.listen(port, () => {
  console.log(`Example app listening on port ${port}`);
});
In order to test the app, run the following command in the root directory of the project:
node app.js
Yayyy! The Node application is now running and you can make a GET request to test the API as well.
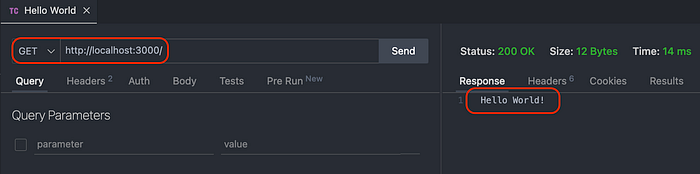
If you are wondering what software did I use to test the API, it’s VS Code! with an extension called Thunder Client.
Now that we have our basic Node JS app working, we can Dockerize this app.
Dockerizing a application basically means creating a Docker Image of the application.
Dockerizing a Node Application
First, let’s create a folder in the root directory called docker-setup just to keep things clean.
mkdir docker-setupThen, let’s create a file called Dockerfile inside the docker-setup folder. That’s it, that’s the name of the file, no extension is required.
# Put the LTS version of Node here, 18.12.1 was the LTS version when this blog was written.
FROM node:18.12.1

RUN apt-get update && apt-get install -y vim

WORKDIR hello-world

COPY . .

RUN npm install

CMD [ "node", "app.js" ]
Next, you can copy the above lines and paste them into the Dockerfile.
You may be confused about the lines of code that we just pasted into the file. Worry not, let’s go through the entire file line by line!
Base Image
The first line FROM node:18.12.1 signifies the base image of the custom Docker Image that we are trying to create. Every custom Docker Image requires a base image, on which we can build our own images on top.
There are various public base images on Docker Hub, and other public Docker registries.
Let’s say there is no public image for the application that you are trying to build, you can specify the base image as Ubuntu or Alpine Linux, and then manually install the tool(s) that you require.
That is how public Docker Images for tools like NodeJS are made. Essentially the base image of a Linux distro is used, the tool and all the necessary dependencies are installed, and that image is made public!
By this, we can understand that
Any Docker Image can be used as a base image for another Docker image, this cycle can continue on forever!
RUN Command
Now coming to the second line, RUN apt-get update && apt-get install -y vim. As you can see, we can run any command that is compatible with the underlying OS. apt-get is a Debian command, implying that the node:18.12.1 was created using a Debian Linux distro.
Most of the default base Docker Images for application tools are Debian-based. You can specify other versions if you want as well, like node:18.12-alpine. In order to get the list of valid base Docker Images, check on Docker Hub. For NodeJS, this is the official page.
WORKDIR Command
Line no. 3 says WORKDIR hello-world, here you can specify any name and that will be the working directory of your application inside the Docker Container.
COPY Command
COPY . . on line no. 4 just specifies that copy all the files from the root directory to the hello-world directory inside the Container. With the help of this command, you can copy particular files or folders to particular destination folders inside the container as well!
The next line is just another OS-level command RUN npm install. This command is only valid because we are using NodeJS as the base image. If that was not the case, then we would manually have to first install NodeJS, and then only this command would be valid. Just like your own operating system :)
CMD Command
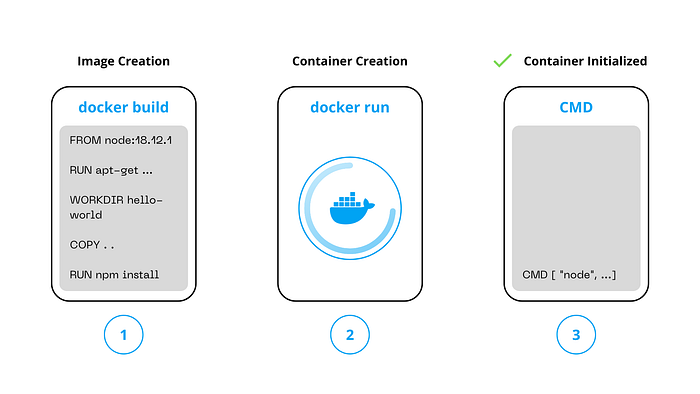
The last command as we can see is CMD [ "node", "app.js" ]. The CMD command in the Dockerfile specifies the command that would be executed once the Docker Container is initialized.
All the commands prior to the CMD command are executed when the Docker Image is being created, but the CMD command is executed after the Docker Container is created.
Docker Container Lifecycle
A Docker Container is nothing but a process created from a Docker Image, running on a machine, that is managed by the Docker Daemon.
Docker Build
In order to create a Container out of the Dockerfile that we created in the previous segment, we first need to build the Image. We can do that by running the following command in the root directory of our sample NodeJS app:
docker build -f docker-setup/Dockerfile -t hello-world .-f specifies the relative file location and -t specifies the Tag of the Image. With the help of this, we can reference the image later.
The above command will run for some time. Once done, and if you did not get any errors, run the following command:
docker image lsYou should see the Docker Image we just built :)
Docker Run
Now, let’s create a Container out of the image we just created. Run the following command in the root directory:
docker run -d -p 5000:3000 hello-worldThe above command is exactly the same as the command we saw with the Nginx Docker Image.
Voila! The NodeJS sample application that we created is now running at port 5000 in a Docker Container!
Docker Logs
While working with large-scale applications, logs are an essential part of the software lifecycle. With Docker, here is how you can see the logs of your application. First, get the list of the Containers by running:
docker container ls 
You should see an output like this. Copy the CONTAINER ID of the container for which you want to see the logs. Next run:
docker logs -f <container-id>The -f tag is for getting the live logs. Basically, if any new logs are outputted to the console stream, then they would also be visible even after the command is executed. If you want to see the logs till you executed the command, then you can remove the -f flag.
Conclusion
There’s a lot more Docker than what was covered in this blog post. Unfortunately, these are all the topics that I will be covering in this blog :( If you want me to write more about Docker and cover more advanced topics, then you can reach out to me on any platform, all my social links can be found on my website:
If you are interested in learning how Docker can be used in a production environment, you can read my blog on
Thank you for making it this far, you are an amazing person :) See you in the next blog, that is if you follow me!